Getting my homelab running
The first thing I need to do is get stuff running and accessible.
First Steps
So I have all of the hardware ready, I just need to get everything connected, software installed, and get some projects started.
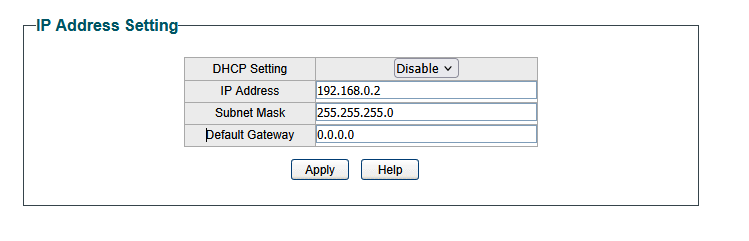
The switch I have is an “easy smart switch”, and it has a neat web-ui. This web-ui defaults to 192.168.0.1, but that’s a minor problem, because my router’s web-ui is on that same IP address. Luckily, this is a simple fix. I just have to statically set my IP to something that isnt 192.168.0.1, and connect my PC to it and change it to something else. I went ahead and statically set my IP to 192.168.0.10, and changed my switch’s management interface to be at 192.168.0.2.
Now, I contemplated for a while what the best setup would be for my situation. I wanted to try to avoid port forwarding. We had some mildly devastating experiences trying to get a VPN to properly work with my school’s infrastructure (in hindsight, we may have spent too much time trying something that was ultimately not controlled by us), so I wanted to learn something else and be able to get that setup quickly on our servers. It then occurred to me, Cloudflare tunneling exists, and it is super straightforward to get setup.
Getting Cloudflare Tunneling Working
My Raspberry Pi was previously used for retro gaming, but since it has a tiny 900MHz CPU and 1gb of ram, it couldn’t play much past the 4th generation of consoles, and we later bought a new Raspberry Pi with some better specs. That meant that this little Pi was unused. I installed Raspberry Pi OS Lite, and began the fairly quick process of getting cloudflared (Cloudflare’s tunnel client) installed.
I simply had to get the correct Cloudflare file, login, create the tunnel, edit the config file a bit, and then run the tunnel.
curl -L https://github.com/cloudflare/cloudflared/releases/latest/download/cloudflared-linux-armhf.deb
sudo dpkg -i cloudflared-linux-armhf.deb
*Note that this file is specifically for 32 bit ARM CPUs.
Once that was installed, I checked with cloudflared --version, and verified it was properly installed.
The next step is to get the Pi connected to my Cloudflare account, and get the tunnel created and properly working.
cloudflared tunnel login gives a URL to sign into your Cloudflare account, and I was able to sign in and properly connect my Pi to my account. Great success.
I then created and named my tunnel with cloudflared tunnel create homelab. This gives a .json file with a very long name, which is my tunnel’s UUID. That UUID is important, so I decided to write it down on a note for quick access. I then created the config file for the tunnel to know where to direct traffic at /etc/cloudflared/config.yml. But one small problem, there’s no services running for Cloudflare to tunnel to. So I took a break from the Pi and went to go get Proxmox up and running on both my machines.
Proxmox Installation
Getting Proxmox installed is incredibly straightforward. I am a big fan of Rufus for creating bootable USB’s, but you can use whatever you please. The first machine was painless, I entered the BIOS, booted from the Proxmox ISO, and went through the beautiful graphical installer. I decided to name this host proxmox1, and give it the IP address 192.168.0.21. However, I ran into the single most frustrating thing I may have ever experienced with the second machine.
So completely unrelated to my homelab, my monitors are 165hz. I also use DisplayPort. It was oddly not a problem on my first machine, but on my second, accessing the BIOS was physically impossible with both of my monitors. I Googled my motherboard and found my BIOS key was escape. I tried so much to get into the BIOS. First, the usual restart, which should give a little screen saying something along the lines of “ESC to enter BIOS”. However, it completely skipped any boot screens and went straight to the Windows login screen. I tried everything I could think of. I tried forcing a shutdown, booting into recovery mode, turning my PC off, unplugging the power supply, holding the power button for 30 seconds to drain the capacitors, removing and putting the CMOS battery back in, but literally nothing worked. It would always skip the boot screen and go straight to login, regardless of me spamming the escape key. After much Googling, I found the possibility that my monitor was too good, and that DisplayPort was not letting me see the screen. I then went and grabbed a VGA cable and a 60hz monitor, and finally was able to boot to the BIOS. This was incredibly frustrating, and I believe it deserved a paragraph to demonstrate my frustration. Anyways, the rest of the install was smooth, and this machine is now proxmox2 and rests at 192.168.0.22.
Now is the fun part, getting Cloudflare to tunnel to these machines. But before I go ahead and do that, we need to deal with security here.
Dealing With Security
The reason I want to have Proxmox available publicly is that I will not be able to physically access this server during the school year. It would be a poor decision to host Proxmox on a public domain without some security measures in place first. Within a matter of seconds, I was able to enable 2FA on my Proxmox machines, using TOTP and some downloaded recovery codes just in case. But I would like to add one more layer of security, and that’s Cloudflare Zero Trust.
The process for setting up GitHub access is quick, and once that is done there’s just two more steps. On the cloudflare dashboard, navigate to Zero Trust > Access > Applications, and click add an application. After that, click Self Hosted, give it a name, and the public hostname for the service (proxmox1.gstorment.dev, proxmox2.gstorment.dev, etc).
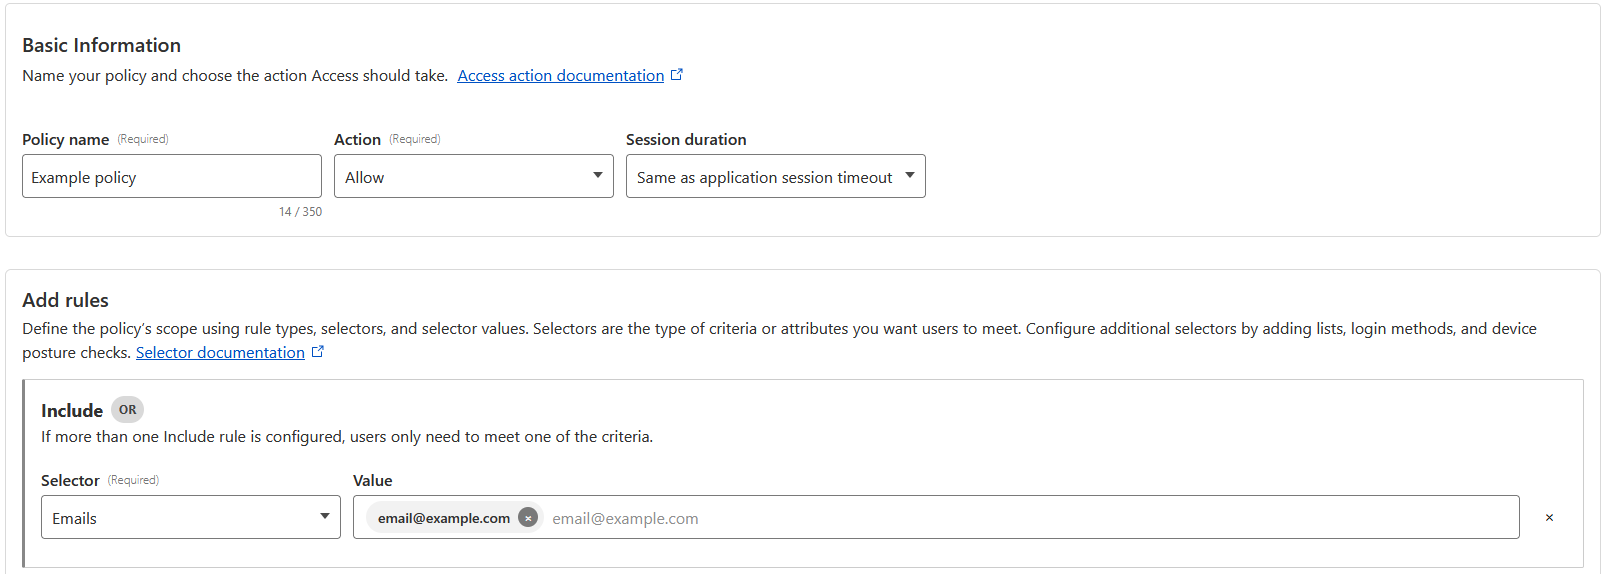
The only step left is to create the policy, and do some configuration to get things how we want it. When creating the policy, select Emails, and list the emails you want to authorize. This is not the final solution I would prefer, I would rather have it be tied to a GitHub Organization, but I was having some problems getting that setup, so we will return to it later. An example is below:
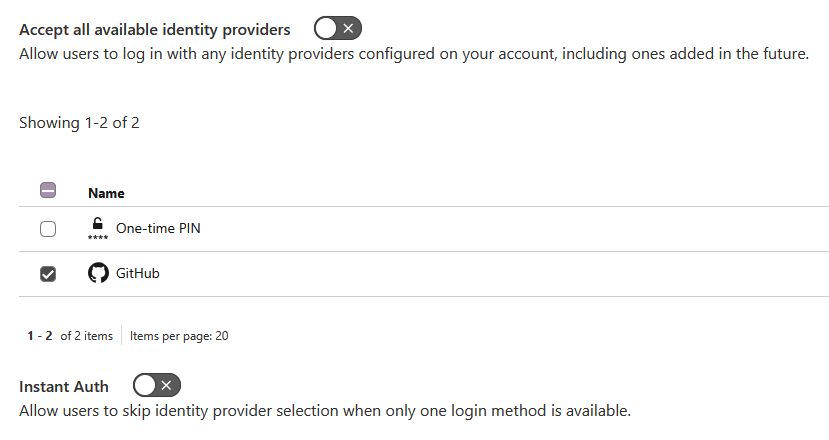
After the policy was created, I made GitHub the only login method.
Now, whenever trying to access Proxmox, you will be required to authorize with GitHub, and it will check the email account associated with your GitHub account for verification. Back to getting stuff tunneled.
Fixing Cloudflare Tunneling Problems
Back on my Raspberry Pi, I went to go configure that .yml file
sudo nano /etc/cloudflared/config.yml
The layout of this file is fairly straightforward, and the first creation of the file looked like this:
tunnel: homelab
credentials-file: /home/user/.cloudflared/{UUID}.json

ingress:
    -   hostname: proxmox1.gstorment.dev
        service: https://192.168.0.21:8006
    -   hostname: proxmox2.gstorment.dev
        service: https://192.168.0.22:8006
    -   service: http_status:404
I presumed this would work, and ran cloudflare tunnel run homelab. I was met with a few problems, and in hindsight, a few of them should have been obvious.
I never configured DNS, so on my Cloudflare dashboard, the only DNS settings configured are to this website (www.gstorment.dev). The solution is to go ahead and add those CNAME records, and give them the correct target. I added the CNAME records, with the names being proxmox1 and proxmox2 respectively, and their targets are both {UUID}.cfargotunnel.com. The second problem was a bit more confusing.
After running cloudflare tunnel run homelab once again, attempts to reach the proxmox web-ui was met with failed TLS validation and this error message:
x509: certificate signed by unknown authority
This makes sense, since Proxmox uses self-signed certificates. I went to go research this issue, and found a somewhat cheap workaround is to add the following to that config file:
tunnel: homelab
credentials-file: /home/user/.cloudflared/{UUID}.json

ingress:
    -   hostname: proxmox1.gstorment.dev
        service: https://192.168.0.21:8006
        originRequest:
            noTLSVerify: true
    -   hostname: proxmox2.gstorment.dev
        service: https://192.168.0.22:8006
        originRequest:
            noTLSVerify: true
    -   service: http_status:404
Now, this “works”. But I was really not happy with that as a solution, and I definitely don’t want to just disable TLS verification to get this running. After doing some more research, it was now time to add a real Certificate Authority (CA) to Proxmox. This is typically fairly straightforward when Proxmox is being port forwarded, because the built in Automatic Certificate Management Environment (ACME) has a nice UI for doing this, but it has one small problem. When checking for domain ownership, it needs port 80 to be open. That’s not how I am hosting Proxmox, so that isn’t going to work. There is however a way to get around this.
I decided to use Certbot with Let’s Encrypt to get a real CA working for Proxmox. The process takes a few steps, beginning with obviously installing the correct version of Certbot for my use case. After making sure apt is up to date,
sudo apt install python3-certbot-dns-cloudflare
We then need to create an API token in the Cloudflare dashboard. In Cloudflare, I used the search bar to find “API Tokens”, and clicked “Create Token”. “Edit zone DNS” is the template we want, and I added my domain (gstorment.dev) to be the zone. This generates an API Key, which is stored on the Proxmox machine at /root/.cloudflare-creds.ini.
sudo nano /root/.cloudflare-creds.ini
And add the following line:
dns_cloudflare_api_token = {API-TOKEN}
Afterwards, we have to run the following commands to create the certificate, and change our current certificates to be the new ones. Here is the command I ran to do this for proxmox1.
certbot certonly --dns-cloudflare --dns-cloudflare-credentials /root/.cloudflare-creds.ini -d proxmox1.gstorment.dev
Those were stored in /etc/letsencrypt/live/proxmox1.gstorment.dev, and the current certificate is stored in /etc/pve/local/. The following commands created a backup of the current certificate, and then changed our certificate to be the new one.
mv /etc/pve/local/pve-ssl.pem /etc/pve/local/pve-ssl.pem.backup
mv /etc/pve/local/pve-ssl.key /etc/pve/local/pve-ssl.key.backup
cp /etc/letsencrypt/live/proxmox1.gstorment.dev/fullchain.pem /etc/pve/local/pve-ssl.pem
cp /etc/letsencrypt/live/proxmox1.gstorment.dev/privkey.pem /etc/pve/local/pve-ssl.key
Now, I can correctly see the certificate listed under the “Certificates” tab in Proxmox, with the issuer being Let’s Encrypt. I thought that was going to fix the problem, but I ran into an interesting error when restarting the tunnel:
x509: cannot validate certificate for 192.168.0.21 because it doesn't contain any IP SANs.
This issue confused me for a while, but I realized the source of the problem. Cloudflare is trying to point to 192.168.0.21, but the CA is not valid for that IP. It is only valid for proxmox1.gstorment.dev. I discovered that the solution is to change the config file to no longer point to the IP, but rather the domain, and change my /etc/hosts file to tell it what the host IPs were. My config file is now edited to be this:
tunnel: homelab
credentials-file: /home/user/.cloudflared/{UUID}.json

ingress:
    -   hostname: proxmox1.gstorment.dev
        service: https://proxmox1.gstorment.dev:8006
    -   hostname: proxmox2.gstorment.dev
        service: https://proxmox2.gstorment.dev:8006
    -   service: http_status:404
And I appended the folowing lines to my /etc/hosts/ file:
192.168.0.21    proxmox1.gstorment.dev
192.168.0.22    proxmox2.gstorment.dev
Finally, there was no more skipping TLS validation, no more TLS errors, and after GitHub authentication and 2FA, I can properly access my Proxmox machines. I can now begin with some projects.